


Ready to start selling your artwork?
Squarespace’s e-commerce shops have ALL the tools you need to get your creative works into the homes of your future buyers.
But first, is Squarespace for you?
Squarespace is a great platform for emerging (or even established!) artists to sell their work online. Their e-commerce shop is easy to set up and has flexible design options so you can customize the layout to your liking and suit your brand/site style.
SQUARESPACE WILL BE A GOOD E-COMMERCE OPTION FOR YOU IF:
- You sell physical or digital products
- Your business is small and you sell a limited number of products
- For instance, you’re an artist releasing a series with under 100 paintings
- Basic shipping options are all you need
- The ability to ship by weight or size
- Shipping costs varying by country or location
- You sell a service
SQUARESPACE MIGHT NOT BE THE BEST E-COMMERCE OPTION FOR YOU IF:
- You have thousands of products to keep track of
- You need very advanced shipping options
It is perfect for artists who have a small-medium inventory of work and are looking for a user-friendly platform.
What’s an e-commerce shop?
The plain and simple of it is: where you sell your stuff. E-commerce functions as your store – any page on your website where you collect money in exchange for a product or service.
Important to note, not all Squarespace have e-commerce features. In order to sell your products, you need a one of the Business plans, which vary in price and features. Here’s a quick breakdown of the difference features and the different price points:
Business – $18 per month
- E-commerce
- 3% transaction fees – Squarespace collects this 3% on top of the fees collected by your credit-card processor like Paypal or Stripe (we’ll get to that in a sec!)
- Accept donations
- Sell gift-cards
Basic Commerce – $26 per month
- E-commerce
- No transaction fees collected by Squarespace
- Accept donations
- Sell gift cards
- Customer accounts
- Point of sale
- Analytics
- Sell products on Instagram (for those of you killng it with over 10,000 followers!)
Advanced Commerce – $40 per month
- All of the above features, plus:
- Abandoned cart recovery emails
- Sell subscriptions
- Advanced shipping features
- Advanced discounts
For most artists looking to create an online Squarespace shop for their paintings, the Basic commerce plan is a great place to start. You have no additional transaction fees, customer accounts (this is so handy for repeat shoppers!), and plenty of options for visually arranging your store.
What you need to do before you setup your shop:
Choose your payment processor. We’re here to get you paid right?! Your current options are Stripe and Paypal, both of which are really comparable in pricing and usability. Both take approximately 2.9% plus 30-cents from each of your transactions.
Prepare your store content. In this case, the high-quality photos of your beautiful artwork, properly sized and named for search engine optimization. Here’s a quickie way to do that! Also, make sure to collect all of the information that your buyers need:
- Price
- Dimensions of the artwork
- Description of the piece – the why behind it, any artists statement info or backstory
- Instructions for shipping or delivery (if these are different from your standard policies)
- Potential questions that you might need to ask your buyer (these can be put on a customized form during the checkout process).
Write your dang policies. There is nothing worse than setting up shop, selling your beautiful creations, only to get an email from a snarky buyer asking how they can return their new purchase. Don’t let your self get caught without a clear policy to fall back on. This protects you, elevates your professionalism, and eliminates potential awkward conversations. Make sure you are 1000% clear from the outset on if/how returns work, your shipping procedures, time-frame for delivery, etc.
HOW TO BUILD YOUR E-COMMERCE ART SHOP IN SQUARESPACE 7.1.
You’ve done the research, chosen your plan, collected your content, now you’re ready to build the dang thing. Here’s a step-by-step breakdown of how to get started.
Step 1. Build a new store page
Head into the back-end of your site, to the Pages section, and to the not-linked section (you can start without linking the site, and link it to your navigation once it’s complete. Choose the ‘store’ option and select a template option (either is fine to begin with).
Name your page, your url, and choose the title you would like to appear in the navigation (for instance, SHOP is clear and to the point!).
Step 2. Add products
The Squarespace template page will automatically give you a bunch of stock products to fill your store. Go ahead and delete each of those to make room for your own products.
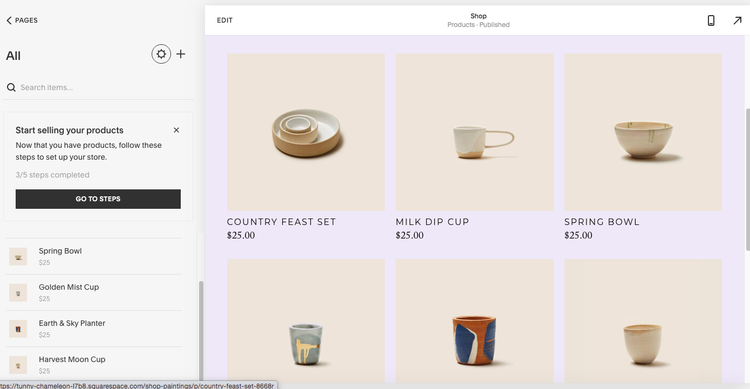
To add products, click the plus sign on the top left side of the page, next to the little settings icon. This will bring up a drop-down menu of product-type choices.
We’re going to walk through the steps of selling a physical item, like a painting.
You will be prompted to add each product, one at a time. Start with your first painting and add an image (or multiple, if you have a variety of shots with different angles or locations!). Then, add a name that you would like to appear as the name or title of the painting.
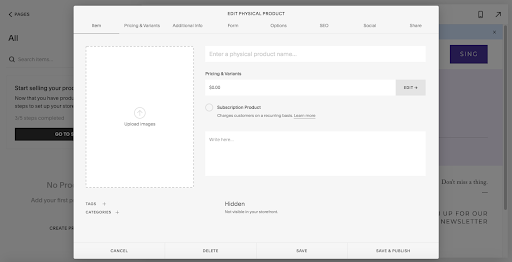
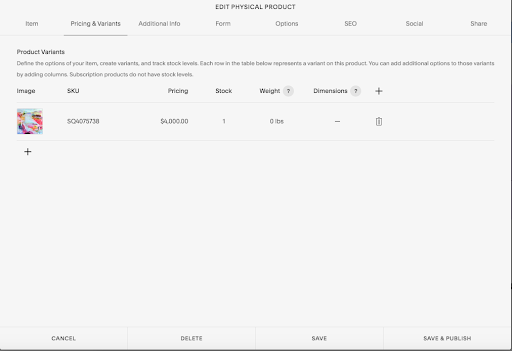
Next, add the price of the painting, how many you have in stock (you might use this if you’re selling prints), and the weight and dimensions if this pertains to your shipping requirements. Click ‘save and publish,’ and rinse and repeat for all of your remaining items.
Step 3. Add any additional info you might need to collect
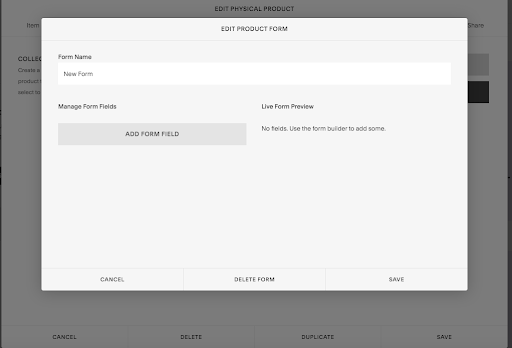
As you’re adding products, you may need to collect more than just the basic information (name, email, from your buyers – for instance, if you’re selling custom greeting cards and you want to hand-stencil someone’s name onto their christmas card).
To do this, you can add a custom form for shoppers to fill out as they’re completing their purchase.
As you’re adding your product, click over to the menu that says ‘form’ and create a new form. Give it a name such as “Additional Information Needed” and add form fields to collect whatever you are needing to know from your buyer.
Pro tip! Each form you create saves as a template, so you don’t need to re-invent the wheel with each product you input.
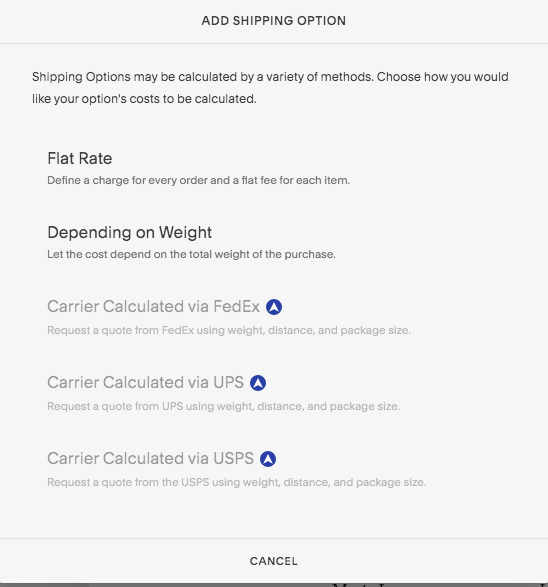
Step 4. Add your shipping options.
To do this, you actually need to leave the page editor and go into the Commerce settings for your website. Scroll down to the shipping option, click ‘add a shipping option,’ and then choose if you would like to charge by weight or by location.
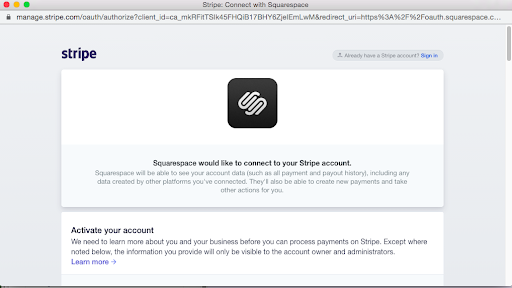
Step 5. Connect your payment processor.
Perhaps the most important step at all! You’ve already set up your payment processor and now is the time to connect it to your Squarespace shop. Lucky for you, this step is really straight-forward.
In the Commerce settings, find the menu option that’s called Payments. Then, select your processor (Stripe or Paypal) and follow the steps to log in and connect the account. A few bits of information to have on hand:
- Your business name
- Business address
- The bank account information for the account that you would like the money to go into
- SIN/SSC (this is optional, I believe)
Then, you’re ready to start making sales and getting your beautiful art into people’s homes!
Go ahead and drag your shop page from the ‘Not-Liked’ to the ‘Linked’ navigation menu and it will appear in your header navigation!

How to set up your Squarespace art shop
July 29, 2021

